Prepare your workspace and ensure that you have all the tools you may need to carry out the installation.
If you are using floor and wall liners for your installation you will need these first.
How to fit the wall liners.
Firstly you need to establish the depth you would like your wardrobes. We recommend 600mm which should allow enough space for your wardrobes.
Mark on the wall the correct depth (front edge of the liner) and using a level, drawer a line from the floor to the ceiling. Do this on both sides (if wall to wall). Please keep in mind that it is better to install skirting after up to the wardrobes, although you can cut a gap in the skirting for the filler to go in.
Once you have marked the wall/s you will need to cut the liners to length and fix them. We recommend using wall plugs and screws every 700mm. Please ensure that they are level and use wedges where necessary.
Caulk gaps when finished.
THINGS TO CONSIDER
Skirting depth- our liners are 18mm thick. Therefore if your skirting is the same depth you can choose not to cut a gap out for the liner to fit into. However if the size is different we recommend cutting a gap out for it.
Coving – if you have coving, we recommend cutting a section out for the liner to go to the ceiling.
How to fit the floor liners.
We do not recommend you fit on carpet as over time the wardrobes will sink. It is best to fit the liner onto the floor boards. The liners will need to be cut to length and fixed to the floor. They should be screwed to the floor boards with fixings every 700mm. The floor liner can be fixed with adhesive if going onto screed.
THINGS TO CONSIDER
If your opening is wider than 2800mm you will receive 2 floor liners to be butted together.
Carry out the previous steps to fit the first wall liner (only wall to end panel) and floor liner.
Using a spirit level mark on the wall a line where the end panel/s will go and cut to size.
Fit the end panel/s using corner brackets wall plugs may be needed to fix to the wall.
Once fixed make sure that the end panel is level.
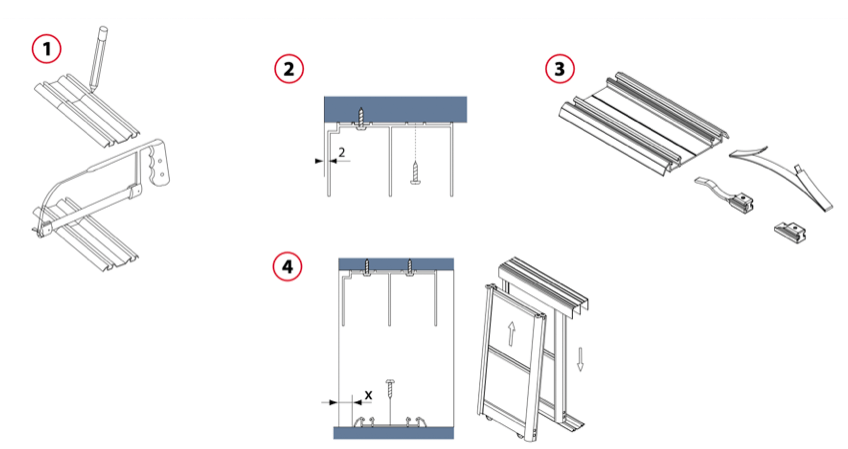
1. Cut the track – Carefully measure the width of the opening at top and bottom, and reduce the lengths measured by about 2-3 mm. Measure off the required track length, marking the future cut line on the tracks. Use a fine-toothed metal cutting saw to cut off the redundant part of the tracks.
2. Fit the top track – Prepare the top track by drilling 5mm holes 600mm centres. Fix the top track with screws, offsetting its flat surface by 5 mm from the door face (inwards). Install the top track with the shade line facing forward in order to mask ceiling irregularities. If a multiple-track system is installed, fix the other tracks so that they fit tightly against each other along the entire length.
3. Install the door – Lay the bottom track on the floor, offsetting it about 27 mm from the door face (inwards). Use a Philips screwdriver and the adjusting bolt to move bottom rollers out about 10 mm. Fully insert the door leaf in the top track, taking care not to damage the bottom rollers, then align the bottom end of the door leaf with the bottom track and slowly lower the leaf, letting the rollers snap into the track guides.
4. Install the bottom track – Use a level to make sure the door is exactly plumb; move the bottom track as necessary. Check if the door travels smoothly along the entire width of the opening. Having precisely set the bottom track, fasten it to the floor. Having installed the track, put the other door leaves in their respective tracks.
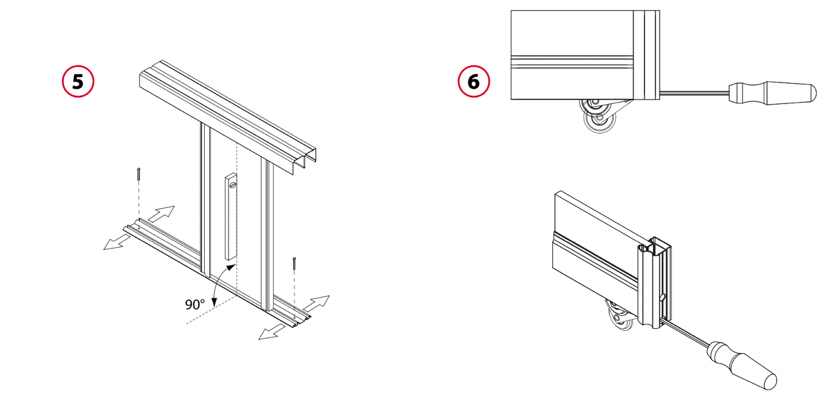
5. Adjust the doors – Adjust door position by means of a Philips screwdriver and the adjusting bolts in the bottom rollers so that the doors fit tightly against the wall along the entire length. Door-to-floor clearance is adjustable between 10 and 40 mm (2 to 32 mm from the bottom track). Follow the instructions given with the delivery for the soft close installation.
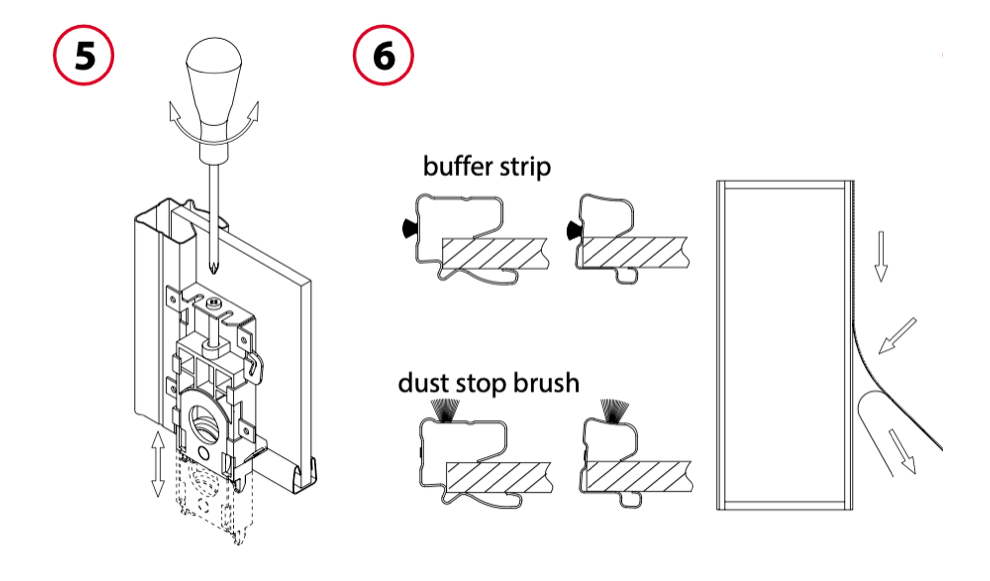
6. Fix the buffer and dust-stop brush strips – Having installed the doors, remove protective backing from the door profiles. With the backing removed, you can fix the buffer strips and the dust-stop brush strips. To ensure good adhesion of the brush strips to the profiles, gently clean the profiles with alcohol or white spirit. Fix the strips, working from top to bottom. Cut off excess strip.
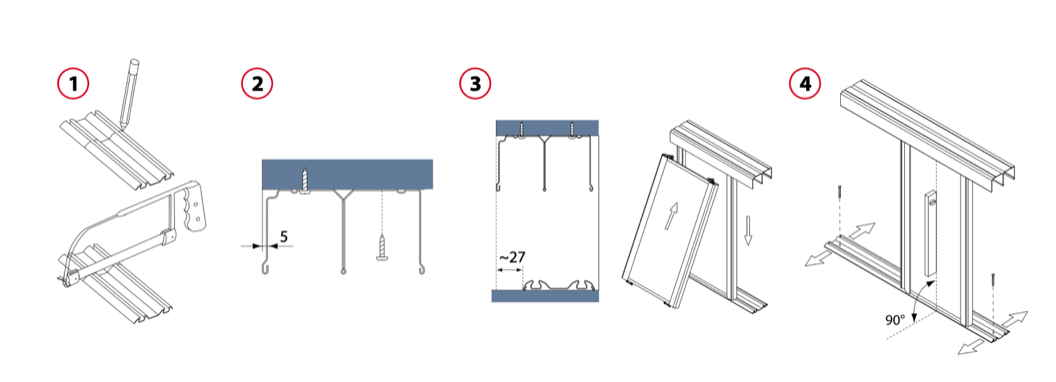
1. Cut the track – Carefully measure the width of the opening at top and bottom, and reduce the lengths measured by about 2-3 mm. Measure off the required track length, marking the future cut line on the tracks. Use a fine-toothed metal cutting saw to cut off the redundant part of the tracks.
2. Install the top track – Prepare the top track by drilling 5mm holes 600mm centres. Fix the top track with screws, offsetting its flat surface by 2 mm from the door face (inwards). Install the top track with the shade line facing forward in order to mask ceiling irregularities. If a multiple-track system is installed, fix the other tracks so that they fit tightly against each other along the entire length.
3. Fix stoppers & positioners in bottom track – If the track is to be fitted with bottom positioners and stoppers, slip them into the respective tracks before fixing. Fully insert the door leaf in the top track, taking care not to damage the bottom rollers, then align the bottom end of the door leaf with the bottom track and slowly lower the leaf, letting the rollers snap into the tracks.
4. Install the door – Lay the bottom track on the floor, offsetting it from the door face (inwards) by 11mm. If the track is to be fitted with bottom positioners, slip them into the respective tracks before fixing. Fully insert the door leaf in the top track, taking care not to damage the bottom rollers, then align the bottom end of the door leaf with the bottom track and slowly lower the leaf, letting the rollers snap into the tracks.
5. Install the bottom track – Use a level to make sure the door is exactly plumb; move the bottom track as necessary. Check if the door travels smoothly along the entire width of the opening. Having precisely adjusted the door position, install the other door leaves in their respective tracks.
6. Adjust the door position – Adjust door position by means of the adjusting bolts in the bottom rollers so that the doors fit tightly against the wall along the entire length. Door-to-floor clearance is adjustable between 11 and 20 mm (3 to 12 mm from the bottom track). Follow the instructions given to fit the soft closers.